

CGI vs Photography – can you tell the difference?
Computer generated image find its use in product photography as more and more companies sell products online. One thing is for sure; it wasn’t always easy for some materials to look this realistic in 3D. Even just a few years ago. With constant computer hardware and software advancements, the results may confuse you today. Let’s explore this notion of CGI photography with the following images.

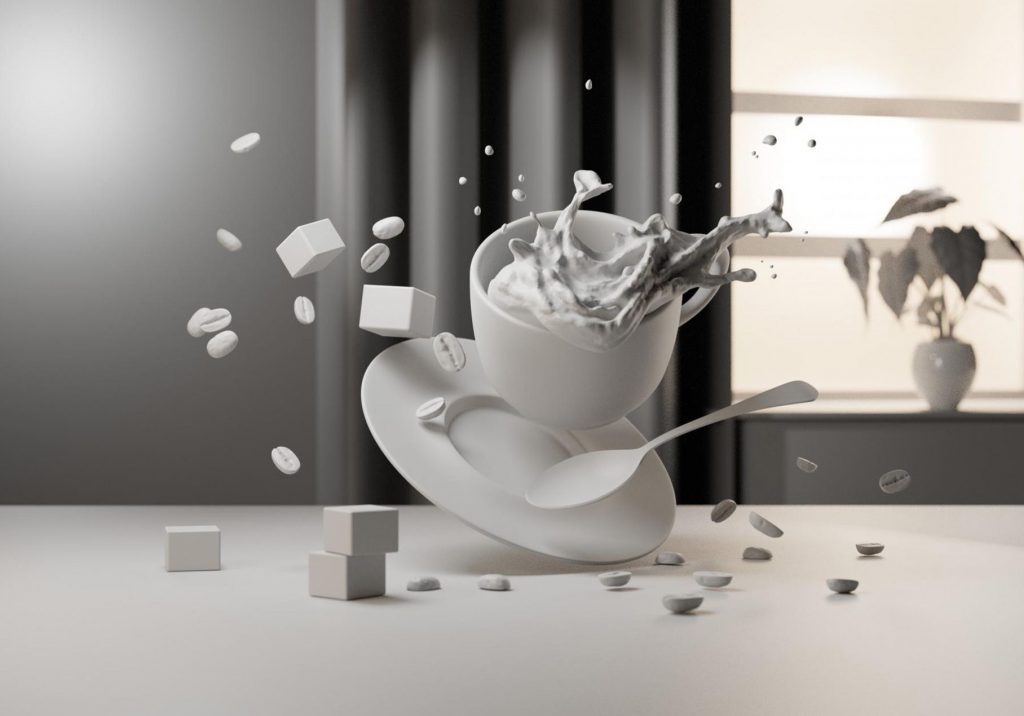
Take a closer look at these two images above. Can you tell which one is a photograph and which one was done completely in a 3D software? Take your time.

Mauricio Oliveira a talented photographer and CGI artist posted this picture in our CGI Photography group a few days ago. We complimented on his work and moved on. Only later we learned via our Instagram profile, that Mauricio got actually inspired by this very photograph. The author of this image is a seasoned product photographer Guilherme Martins and member of our growing community. See the following behind the scene video from his studio where he creates images like this and many more for his clients.
Let us know in the comment below if you were able to spot the difference? CGI photography is getting better and soon you wont be able to, that’s for sure.
I have to admit I wasn’t able to figure out which one is CGI. I wonder how much time he spent on modeling, rendering, styling etc.
lol same here. let’s ask @Mauricio.Oliveira I’m sure he can share some stats with us
This was a weekend project, the scene itself was pretty quick to model, I would say less than 3 hours. The remaining time was figuring out the sugar and the spilling coffee. “Imperfections” are very very difficult to create in 3D, and those imperfections gives that extra realism. My first approach to the liquid was obviously doing a fluid simulation, since it would be physically correct , but I faced two problems: 1- It wasn’t looking not nearly as close as the reference. 2-each setting adjustment meant that I would have to bake again the simulation, and that takes a lot of time.
So I decided to sculpt the liquid by hand, using the photo as reference. It was my first time trying to sculpt anything at all, translating a 2 dimensional liquid picture into 3D is pretty challenging, but the overall result is ok i guess.
Indeed the sugar cubes are too regular, now I’ve figured out a way to do a proper organic one, but when I did this model I couldn’t do it.
I would do the same – baking takes time even if you have have supper fast machine. Modeling takes time too, but it gives you control over it at least. I recently started to use PBR textures height maps and displacement modifiers to add randomness to models – it so quick and effortless with enormous controls of realism in imperfections.
Hi, I could see the difference and that the right one is CGI. However, he did a great job in modeling, texturing and rendering. It´s only visible in the shape of the sugar tiles. Real sugar is not as uniform as the CGI variant.
Good point, thank you for your input. I was wondering the same about the sugar. I think I’m going to investigate it a little bit more how to do sugar properly.
Yes, nice work. I picked the sugar cubes, and also the table surface textures and shadows on the real shot look untidy, and the oblique shadows of the beans on the table look more realistic than the ones on the right. Also, the liquid looks translucent in the real shot but opaque in the CGI shot. But I’ve never done CGI in my life, something for the future maybe.
You are absolutely right. Creating imperfections in CGI and 3D is essential. CGI is the future of product photography. I’m witnessing everyday things and I can’t believe my eyes. Now I know photographers won’t be able to compete with this technology in the future. The only ways to learn it